WordPress SEO – 6 basic tips for better SEO
What most people don?t realize is that, WordPress is Google friendly, the problem is that some WordPress Themes actually interface with search engines ? not WordPress itself.
Here is the list of 6 tips that will help you rank better in Google. This tips won?t guarantee you first page rankings. Some parts of this article are inspired from WordPress SEO – The Ultimate Guide to WordPress Theme Search Engine Optimization.

1. Generating a sitemap for Google
First step that you want to make when you want to promote your website, is to make a sitemap. More info about sitemaps.
You can generate a sitemap manually or by using a plugin like Google XML Sitemaps.
The first thing you have to do is download and unzip the plugin. The next step is to configure the plugin.
Navigate to the ?Settings -> XML-Sitemap? page in your WordPress Admin and scroll down to the ?Basic Options? section.
Sitemap Files
You definitely want to have at least one of these selected. You?ll need to be able to tell Google (and the other search engines, if desired) the location of your sitemap. I also recommend, due to compatibility issues, that you do choose the ?XML File? option.
Rebuilding Mode
If you update your content regularly, then you?ll need to have your sitemap rebuilt when you do. Only choose the manual option if you use an external program to publish your content.
Update Notifications
Although the benefits of doing this haven?t been clearly shown, it can?t hurt to notify as many search engines as possible when you publish new content.
Advanced Options
The only option I would check here is the ?Build the sitemap in a background process? option. This allows you to publish a post without fear of waiting forever for the sitemap to regenerate.
Now let?s talk about the other options of this plugin.
Most of the other options are preferential, but the options you choose here could be extremely important in letting Google know what you consider your best content, and therefore what content should be indexed most often and with the highest priority.
Additional Pages
If you have pages that reside outside the WordPress installation you happen to be working in, and you want them included in the sitemap, feel free to specify them here.
Post Priority
I generally don?t like to give posts priority over each other. But if, for instance, the number of comments on any of your posts is a good indicator of the strength of that post, you may want to use one of the other options to give those posts with more comments a higher priority.
Location of your Sitemap File
I prefer the default here, but you?re welcome to choose a custom location. There is no adverse effect to doing so.
Sitemap Content
In most cases there should only be three options selected here, Homepage, Posts and Static Pages. There?s really no reason to include the other options unless you specifically want those things included. And because content tends to duplicate many times over in the various archives, it?s best to leave them alone.
Change Frequencies
Answer these questions as honestly as you know how.
Priorities
This is really where you have the advantage ? being able to specify what you consider the highest priority content! I normally give the homepage and posts the highest priority, followed by static pages. Everything else I give a low priority.
Once you have all your options set, click to save the options. Now that we have a sitemap, all we need to do now is get Google to find our sitemap and start using it.
2. Getting your site indexed by Google
The first thing you?re going to need is a Google account (or Gmail account).
Once you have that, you?ll want to head over to the Google Webmaster Tools (https://www.google.com/webmasters/tools/dashboard). Once you have arrived at the Google Webmaster Tools page and have signed in, the first thing you?ll want to do is add a site. Just input the URL for your site and click ?Add Site?.
The next page will ask you to verify the site. So, Google uses one of two methods of verification – you can either upload an html file to the root of your website?s domain or you can insert a META tag in the <head> section of your website.
After you have verified your site, click the ?Sitemaps? link on the left menu. This is where you are going to tell Google the location of the sitemap you generated (normally located at www.yoursite.com/sitemap.xml).
Click the ?Add Sitemap? button on the left menu and choose ?Add General Web Sitemap?. Now type the location of your sitemap and click ?Add General Web Sitemap?.
Now that you have Google crawling and indexing your site, we want to make sure everything else is optimized for it.
3. Getting Google to index and follow the right stuff
The next thing in your journey is telling the Search Engines what they need to index.
The biggest problem of WordPress in terms of SEO is the ?Archives? section. These ?Archives? are generated automatically based on things such as categories, dates, tags, authors, etc. And each one of these archives is considered by search engines as being another page of content and Google doesn?t like that.
The solution of this is very simple, place th efollowing code in the header.php file for your theme.
<?php if(is_home() || is_single() || is_page()) { echo '<meta name="robots" content="index,follow" />'; } else { echo '<meta name="robots" content="noindex,follow" />'; } ?>
This code does the following, ?If this is the homepage, a single post, or a Page, then you are allowed to index it. If not, then do NOT index it.?
Ok, so let?s move to tip number 4.
4. Using Keyword-Rich Permalinks
Before we optimize our permalinks, we need to understand what they are. Permalinks aren?t always pretty. In fact, WordPress calls the ?example.com/?p=11? format ?Ugly Permalinks?, and they?re right.
WordPress handles permalinks in one of two ways: either the ?ugly? way, or the ?pretty? way. And, by default, your site will have ?ugly? permalinks. So we need to make them ?pretty?.
Setting up WordPress
Log into your WordPress Dashboard and click ?Settings? then ?Permalinks? (in the submenu). I recommend you to use the /category-name/title-of-blog-post/ structure, you can set this structure be selecting ?Custom Structure? and type ?/%category%/%postname%/?.
5. Optimizing your <title>
Arguably, one of the most important elements of a website from an SEO perspective is what comes between the <title></title>; tags in the header of your page.
What you put between the <title></title> tags is considered by the search engines to be THE MOST important information about the page it is viewing.
So, being able to control this is vitally important.
The default structures of the <title> tag is:
<title><?php bloginfo('name'); ?> <?php if ( is_single() ) { ?> » Blog Archive <?php } ?> <?php wp_title(); ?></title>
This structure is bad for SEO, since the content it puts first is the title of your blog/website.
The most irrelevant part of your titles is your blog?s name. So, move it to the end instead of the beginning. <title><?php wp_title(''); ?><?php if(wp_title('', false)) { echo ' :: '; } ?><?php bloginfo('name'); if(is_home()) { echo ' :: '; bloginfo('description'); } ?></title>
This code does the following: if viewing the homepage, it will display ?Title of Blog :: Tagline of Blog? – and if viewing a single post or page it will display ?Title of Post :: Title of Blog?.
Now we have optimize titles, moving to the last tip, headers.
6. Optimizing your header tags
The second most important thing in your website, after the <title></title> tags, is the <h1></h1> tags.
Let me make one thing clear: the H1 tag should only be used ONCE on any given page and it?s recommended that the content of the H1 tag and the <title> tag to match.
If you?re a developer, you probably already know how to apply this information in a WordPress theme. But generally, here are some good places to look:
To remove the H1 tag from the blog title or logo, look in the header.php file.
To remove the H2 tag from the widgets, you?ll want to modify the widgetization code in functions.php.
To use the H1 tag as a single post or Page title, check out single.php and page.php.
To use H2 tags in single posts or Pages, use the HTML editor or use the extended WYSIWYG options
 How to Start a Functioning Website Under Thirty Dollars 2021?
  The HTML5 Time Element Is Back and Better Than Ever
  Mozilla Introduce Firefox 9, with Speed and less memory improvements
 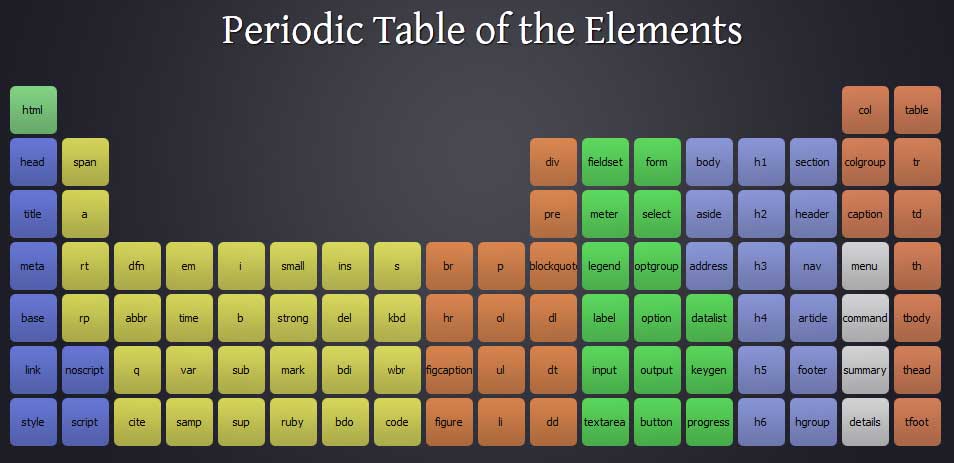 Periodeic table of HTML5 Elements, arrange by type.